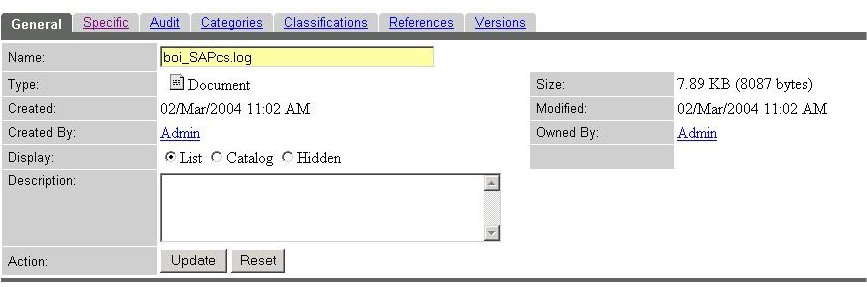
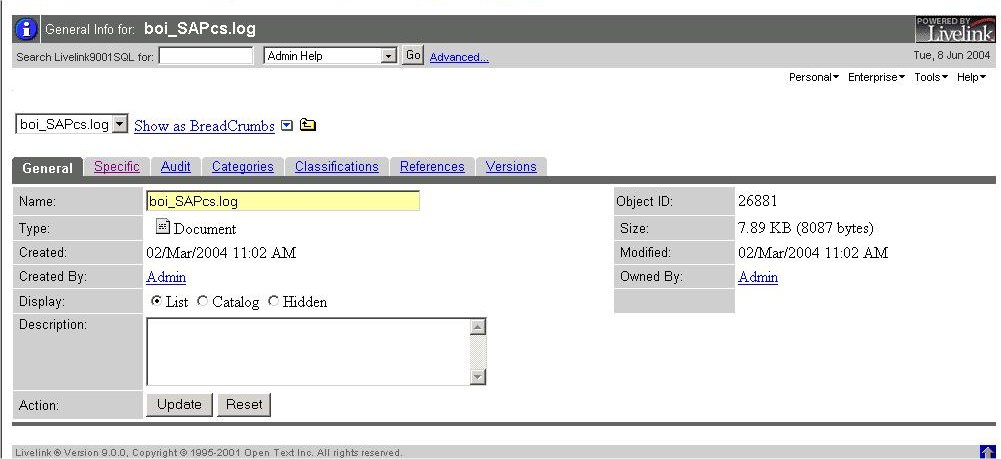
 Firstly, we identified what we wanted to do, in this case add a field to the table displayed when you show the properties of an Object. Next, we looked at the current screen provided by Livelink, to see what changes will mean to what the user actually sees. The image opposite shows a screenshot of an Info->Specific screen within Livelink, which is where we want to make our change, Looking at the screen, we are going to add the new field next to the Name field, in the same column as the Size field.
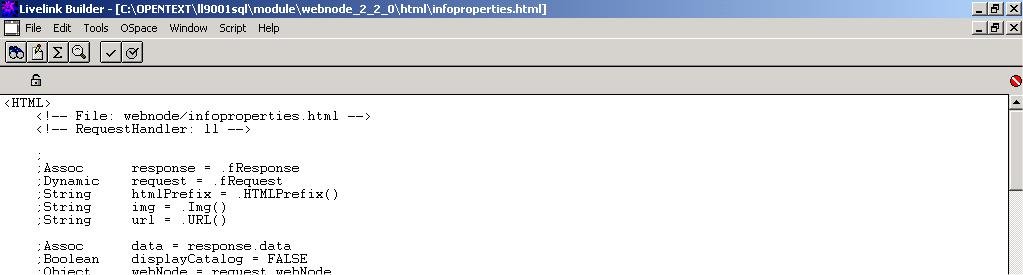
 Now that we have located the particular Livelink screen that we need to amend, we need to look at the its source code. What we are looking for is the section of the page where our change will end up, once we have found this, we move up the page to see which template this is in - OpenText helpfully include a start / end comment for each WebLingo template which includes the path and filename.
In this case, the WebLingo Template we want is called \webnode\html\infoproperties.html. Opening this file in a text editor, we navigate to the relevant section of the file and make the changes to the HTML so that the Name input tag only occupies a single column and we add two additional cells, one for the label - which will be Object ID - and one for the value - which currently will be a single space - to preserve the structure of the table. We then save this change and quit the editor.
 Now we need to find the value to place in the cell we have just created. To do this, we load the Livelink Builder and open the template we are working on and set a break point on the WebLingo file - by clicking the green circle in the top right corner once so it goes red. Then we navigate to this screen using the web browser. Attempting to load this page will cause the Livelink Builder Debugger to begin as soon as Livelink interacts with this template.
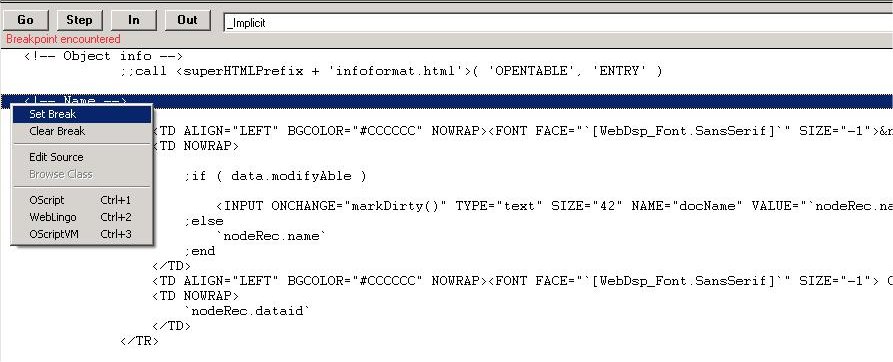 Now that the template is being processed by the Livelink Debugger, we need to set a break point just before our amendment to the code, we do this by right clicking on the relevant line and selecting Set Break option from the context menu as shown in the diagram opposite. A red diamond (
 ) appears at the start of the line to indicate the breakpoint. Pressing the Go button will then let the Debugger continue processing the WebLingo template up to that breakpoint.
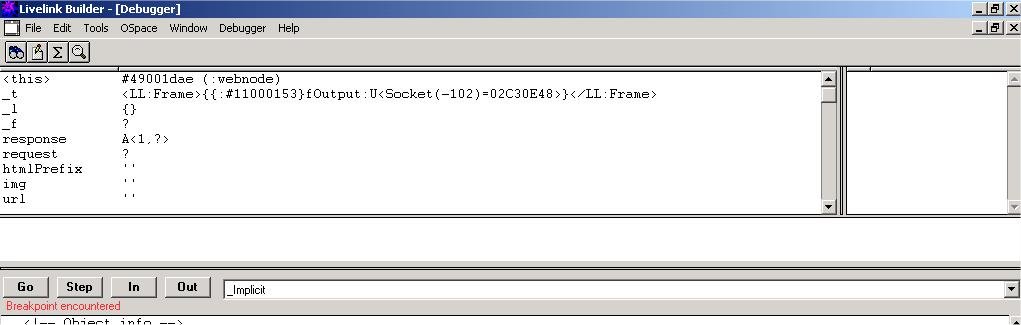 When the debugger stops at the breakpoint, we are able to see all the Objects and their properies as well as all the variables available at this point. Scrolling through the list of available Objects in the top part of the Debugger screen, we find the one we need - NodeRec. This is the one that is used in the other lines in the WebLingo file to display other properties of this Livelink Object. Examining the contents of this Object, we come across the property that has the value of the Object ID - dataid.
Knowing this, we clear the breakpoint on the line, and then press the GO button again to complete the processing and display of the page. Now we navigate back to the file editor screen in the Livelink Builder and locate our new HTML, where we initially had the blank space, we now add some OScript to indicate the value we wish to be displayed at that point - `nodeRec.dataid`. We then compile the page and refresh the webpage causing the debugger to restart, this time as we move though the file to the end - either by using the Step option to move line by line or the Go button to run to the next breakpoint, or the end of the file if no other breakpoints are present.
 Looking at the page that is returned in the browser, we can see that our change has been successful as both the field label in the first new cell and the field value in the second new cell are now present on the screen. As a final check, we compare the Livelink Object ID shown on the screen with the one held in the Browsers URL to ensure that they are the same, this is to ensure that we are using is the correct value for that Livelink object. To ensure that the customisation works, we navigate to the same screen for a variety of other Livelink Object Types, for example a Task List, an image, a Compound Documents, to ensure that the customisation works correctly for each Object Type that we need it to within our Livelink system.
If you get any errors after you have added the Livelink variable into the template - either a Livelink error message or a different value displayed from what was expected - check to ensure that the variable exists and is populated at the point that you are calling it in your customised template and that you are using the correct markup character - ` and not ' for example.
In conclusion, we have now added an additional element to one of the screens with our Livelink system, and the processes used here can be reused as we make other changes to a Livelink system.
When you change any Livelink WebLingo template, it is very important that you document your change as any Livelink update - for example a monthly patch, service pack, module install/uninstall or version upgrade - could alter the WebLingo template. More information and guidelines can be found on the Livelink Guidelines page.
One way to help protect your Livelink system is to use the CustomizationRT module which allows you to define a lookup list of WebLingo templates to be used instead of the ones provided with Livelink or its optional modules.
An alternative to amending the WebLingo files directly or using the Customizations RT module, in some cases, is the Appearance module.